

- 1 large pumpkin
- 2 tbsp butter melted
That’s it! The caramel apples – they’re not needed but will be a delicious reward for you 🙂

Step 1: Take a large knife and cut the pumpkin in half. You can cut the top of and then slice the pumpkin in half. Or you can slice it all the way around and use the cut to break the stem in half. Both are relatively easy to do. Just be careful with your fingers – you need them later ;).

Step 3: Cut the pieces into smaller pieces and brush the cut edges with the melted butter.

Adjust your shelves so your pumpkins will fit and bake for 1-2 hours until soft.
Step 5: Allow to cook for about a half hour. Use a dull knife and remove the skin from all of your pumpkin and chop into small 1 inch pieces.
What to do now?
Use it immediately!
Puree and drop it into pie recipes, soups or other recipes.
Freeze it!
Puree it and put it into plastic containers and put it in your freezer for about 6 months. They will last well into the holiday season.
Can it!
Doing this method means your canned pumpkin will last up to 12 years in the basement or on your shelves. Not that you wont use it by then, but it keeps your pumpkin fresh well into the spring and beyond. Allowing you to enjoy that lovely fall flavor all year!
The FDA does not recommend you puree or smash the pumpkin before you can it. To decrease the chance of bacteria growth leave them in chunks and pressure can them.
Canning Instructions:
- Place 12 clean pint mason jars on a rack in your stock pot – you may have to process 6 at a time. Fill the jars and a stock pot with cool water until it completely covers the top of the jars. Cover and put on medium heat. Simmer but do not boil.
- Prepare 12 lid sets, put the bands aside and put the flat lids in a small sauce pan and put on medium heat. Do not boil, but keep warm through the whole process.
- Prepare your pumpkin to the directions above.
- Now, remove the jars from the warm bath. Tip them as you pull them out and pour the water back into the pan. Place them on a towel on the counter with the opening up. Do not dry them! Just put them down and put the funnel in. Fill each jar with your 1 inch chunks of pumpkin. Pour hot water in each jar until there is 1 inch head space.
- Take the small magnet tool and remove flat lids from their hot bath. Place over top of each jar. By hand screw on the collars, but not too tight! Remember some air still needs to get out of each jar.
- Place your wrack inside your pressure canner, and set your filled jars on top. Pour in 2-3 inches of hot water. Close your lid.
- On Medium-High Heat wait until your canner begins to let steam out of the vent. Allow the steam to vent for 10 minutes, then switch to the 2 position. Wait until steam starts coming out again.
- Process for 55 minutes. After 55 minutes are done, turn off the heat and wait for the canner to depressurize.
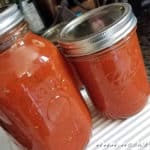
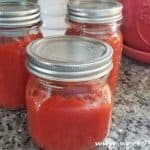
- Once the canner is safe to open, open away from you so any extra steam will not hit your face. Remove your cans and put them on a clean towel to set. Wait for those lovely “pop”s to know your cans have properly sealed! Let them rest 12-24 hours before moving or using. Store in a cool, dark area.
It’s that simple! You get fresh pumpkin all year round. The best part – from a $5 pumpkin – I got 12 pints of canned pumpkin. To use it for pies and recipes I simply drain off the liquid and puree it. It has been processed and roasted so really you can puree it with the back of a spoon or in your mixer.
Each pint has about 2 cups of pumpkin in it – enough for 1 pie recipe!

Put the ones you want to keep in a small bowl with water and let them soak. Rub them in the water and remove any goo that is still on them. Remove any orange from the tip.
Then you simply put them in a paper towel until they are dry. You can do a couple things with them!
- Put them in a baggie and a dry place and save them to plant next year’s pumpkin patch.
- You can roast them! Toss them with a bit of salt and 2 tsp of melted butter. Pop them in a 300 degree oven in a single layer for about 45 minutes. Let them cool and enjoy 🙂
[amd-yrecipe-recipe:73]


[…] you just search for Pumpkin on our site, you’ll see that I love the stuff. Enough to can my own pumpkin and use it all year long. I can’t get over the Pumpkin Spice trap either, I just love that […]
[…] cents. I think it’s definitely worth the time and effort on this one! We just ran out of our home canned pumpkin, and our shelves needed […]
[…] 1 15 oz can of Pumpkin (I used home canned pumpkin) […]
[…] of the recipe is pumpkin puree. You could always buy your own canned (or boxed), use your home canned pumpkin, or make it […]
Thank you for sharing. I want to can using my hot water canning method… will that work?
I don’t believe so – I think it doesn’t seal it properly with the low acidity. That means it could get botulism. If you don’t have a pressure canner – I’d freeze it instead.
My aunt has used the water bath method all her life and now I do too. I add 1/2 – 3/4 teas canning salt per pint, and process for 45 mins. Jars seal just like any canned item, and pumpkin stays good for years. I don’t add salt to my pumpkin pie recipe since salt is already there.